Application introduction
The terminal cross-section analyzer is a precision detection and analysis equipment specially developed for quality inspection of the wiring harness industry. The entire wire harness cross-section analyzer system consists of terminal cutting equipment, grinding equipment, corrosion cleaning, cross-section image acquisition system, wire harness terminal image measurement and analysis system and other units. It adopts ergonomic design, modular combination, and assembly line workflow to make operation more convenient and quick. The full set of detection systems can complete the processing and analysis of a terminal within 3 minutes, greatly improving the speed of terminal cross-section quality inspection. Simple operation, high-quality image acquisition system, and precise measurement and analysis escort your production. High-performance microscopic observation instruments and special software can simply and correctly measure length and calculate area. The magnification ranges from 20 times to a maximum of 500 times. Ultra-fine wires exceeding AWG30 can also be clearly displayed. Using the company's newly developed cross-section analysis special software, CH・CW can be measured and the cross-sectional area can be instantly calculated. The measurement accuracy at the maximum magnification is 1-2µm.
The wire harness cross-section analyzer detection microscope can produce an upright three-dimensional image when observing objects. It has a strong sense of stereoscopic, clear and wide imaging. The wire harness cross-section analyzer has a long working distance: it is equipped with a high-precision wire harness terminal image measurement and analysis system, and is combined into a wire harness terminal detection microscope. The perfect combination of high-quality optical system and high-resolution camera makes the cross-section image clearer, and the unique fixed magnification and fixed gear make the measurement more accurate.
The wiring harness of the whole vehicle shall comply with: VW60330, QC/T29106-2004 Technical conditions for low-voltage wiring harnesses of automobiles.
(1) The standards for inspecting the size of wiring harnesses are specified.
(2) The performance requirements for the materials and components used in the wiring harness are specified.
(3) The connection method between the terminal and the wiring harness and the requirements to be met after the connection are specified.
(4) The requirements to be met at the connection point between the terminal and the wiring harness are specified.
(5) The sealing plug should not be damaged during crimping. There should be no visible gap between the wire and the sealing plug, and between the sealing plug and the sheath.
(6) When wrapping the wiring harness, it should be tight and uniform, and should not be loose. When using a protective sleeve, there should be no displacement and bending of the wiring harness.
(7) The wires and components in the wiring harness should be assembled correctly, there should be no misalignment, and the terminals should not fall out of the sheath.
(8) The line conductivity in the wiring harness is 100%, and there is no short circuit or wrong circuit.
(9) The wiring harness needs to undergo high and low temperature resistance, humidity cycle change performance test, vibration resistance test, salt spray resistance test, industrial solvent resistance test, etc.
System Features
1. No need for resin solidification (using the latest German and Japanese wire harness detection method to shorten the detection time)
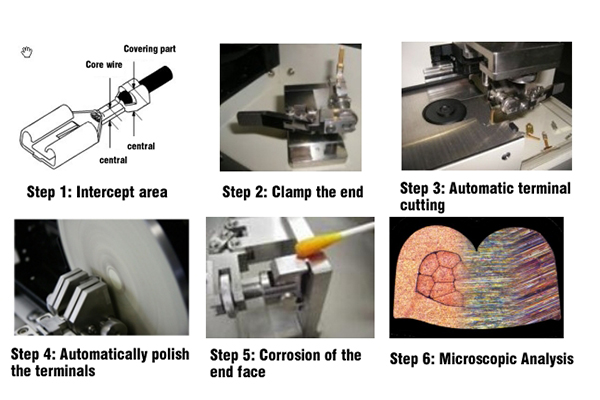
The resin solidification method so far requires resin hardening, resin cutting, rough grinding, and grinding to make samples. It takes several hours to make a sample. This product does not require resin solidification, and it only takes 3 minutes to make a sample.
2. Professional wire harness cutting, grinding and polishing machine (optional fully automatic model)
The professional wire harness terminal cutting and grinding integrated type is suitable for small wire harness terminals. The precision cutting of the terminal can be adjusted by 0.01mm up and down, and any terminal part can be cut. The ultra-thin terminal special cutting blade is used to cut the internal material structure of the terminal without damage. Other companies use scissors to deform the internal structure of the terminal and have no detection significance.
3. The terminal special fixture can correspond to various sizes of terminals
The newly developed fixture can clamp various types of terminals. There is no need to worry about the deformation of the wire teeth or the flying of the wires during grinding. No special skills are required. Anyone can operate it easily. The attached standard fixture can correspond to AWG8-AWG26 wires, and the fixture for fine wires (AWG26-AWG36) can be added with a special fixture for resin solidification samples (maximum diameter Ø40mm). Other fixture sizes can be customized according to customers.
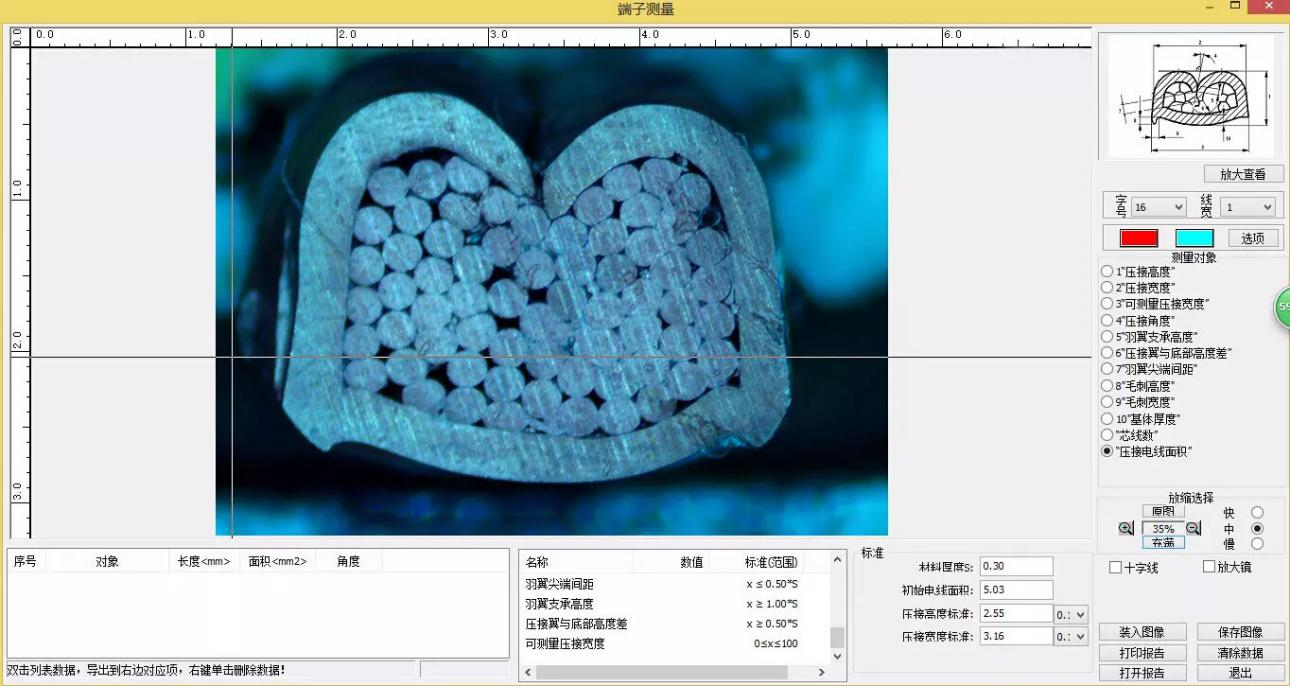
4. Professional wiring harness terminal analysis software can analyze compression ratio, area, C/H, C/W and other data
The magnification is 20 times-up to 500 times, and extremely fine wires exceeding AWG30 can also be clearly displayed. In addition, a new software for professional wiring harness terminal analysis has been developed, which can measure and identify compression ratio, area, C/H, C/W, etc. instantly.
The software developed by our company can save and print the measurement results in report format.
The various measured data and the compression ratio of the core wire can be transmitted to Excel and WORD documents together with the bright cross-sectional graphics, and complex evaluation report pages can be easily created.
Configuration description
1. Terminal cutting and grinding integrated table
2. Terminal special cutting disc
3. Terminal special fixture
4. Terminal microscopic analysis lens
5. Terminal mobile workbench
6. 3 million high-definition industrial camera
7. LED lighting device
8. Special corrosion liquid for wiring harness terminals
9. Professional terminal analysis software
10. Standard calibration ruler
11. Terminal grinding sandpaper
Technical parameters
1. Precision manual cutting table (including professional fixture) motor 3000rpm
2. Precision manual grinding table (including professional fixture) motor 1450rpm
3. Terminal cross-section microscopic analysis magnification: 0.7-4.5X or 1-5X (6 gears), video total magnification: about 30X-300X
4. Applicable range of wires: 0.05m㎡-107m㎡
(It can be upgraded to 300m㎡ by purchasing other equipment)
5. Power supply: AC100V-AC240V
6. Imaging industrial camera: HD 3 million
7. Imaging system software: Guangzhou Weiyi metallographic image analysis software
8. Cutting disc specifications: Φ120*0.5mm
9. Grinding sandpaper: 1200#, 2000#
10. Standard fixture: small V groove: 0.01m㎡-50m㎡, large V-groove: 50m㎡-107m㎡
(Upgrade to 300m㎡ by purchasing other equipment)
11. Professional terminal analysis software with encryption lock and CD
12. Standard calibration ruler
13. Special corrosion liquid for wiring harness terminals
14. Lighting source: all-white adjustable LED lighting device (cold light)
15. Dimensions: 432*370*320mm
Technical requirements:
The following are the requirements of the national standard for the cross-sectional analysis technology of automobile low-voltage wire harnesses!
1. The size of the wire harness should meet the following requirements:
The length of the main line and the protective sleeve should not be less than 100mm, and it should be a multiple of 10. For example: 100mm, 110mm, 120mm.
2. The length of the branch line of the terminal section analysis system should not be less than 30mm.
3. The distance between the contact points and the branch point should not be less than 20mm.
4. When an insulating sleeve is required at the connection between the wire and the terminal, the length of the insulating sleeve shall not be less than 20mm.
5. The crimping method should be used for the connection between the terminal and the wire, and the connection should meet the following requirements:
6. The terminal should be pressed on the conductor and the insulation layer respectively. The conductor should not be broken, and the insulation layer should not be pressed into the conductor crimping part. The wire conductor can be seen in area a shown in Figure 2, but it cannot hinder the plug-in.
7. After the insulation layer crimping part has been subjected to a bending test of not less than 3 cycles, the insulation layer can still be seen in area b shown in Figure 2.
8. The cross-section of the crimping part of the terminal and the wire using the crimping method shall meet the requirements of Appendix A.
9 The cross-section inspection of the crimping of the terminal and the conductor and the crimping joint shall be carried out according to the following method.
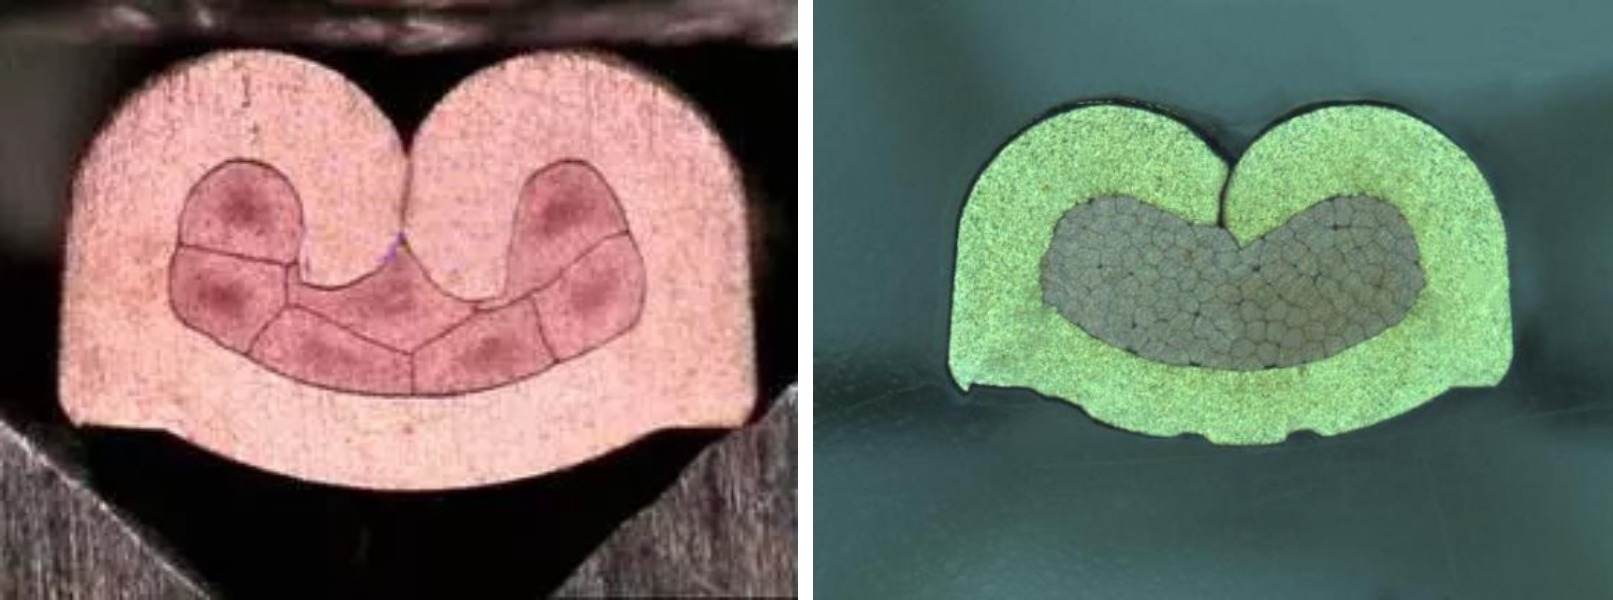
10. Sample preparation Wire harness terminal testing equipment: Cut the sample to be tested as shown in Figure 7 (avoid the reinforcing ribs of the terminal), take one side as the sample, and grind the cross section flat and perform chemical corrosion treatment until it can be sampled: observe the prepared sample cross section with a microscope and check it against the requirements of Appendix A.
Sample preparation only requires the following steps

Software Features (Professional Terminal Analysis Software)
The latest terminal analysis software has made great improvements in measurement and reporting, with the following features:
1. Measurement is faster and more convenient than before. The entire measurement process is divided into 12 items: C/H, C/W, C/R, wire core and angle measurement, which meet the public, general and other international standards. You only need to click the mouse to get the data immediately (automatic identification and analysis data).
2. The report is more professional and complete than before, using the latest terminal detection system from Germany and Japan. After we implanted this system in the software, our company simplified the operation of the terminal analysis software, but strengthened the function, making it easier for users to get started.
In addition to the above features, the software also maintains the original features, such as: multiple language conversion, automatic conversion of Chinese and English reports, burr height measurement, material thickness measurement, eccentricity measurement, etc.
Sample display made by our company: