products
HomeOur ServicesFully Automatic Terminal Cross Section Analyzer

Fully Automatic Terminal Cross Section Analyzer

WYD-3000Z-DC300
Equipment Function Overview
The fully automatic terminal cutting and grinding machine is mainly used for the preliminary cutting and rough grinding of the cross-section detection of wire harness terminals in electronic circuits, automotive industries, etc. The equipment is equipped with a set of fixture pads as standard, and can use cutting discs to cut terminals of different materials or other small workpieces. The cutting speed is fast and the grinding speed is fast, which greatly improves the process efficiency and efficiency. The whole set of fully automatic terminal cutting and grinding machine system consists of terminal cutting equipment, grinding equipment, corrosion cleaning, cross-section image acquisition system, wire harness terminal picture measurement and analysis system and other units.
The various measured data and the compression rate of the core wire and the bright cross-section graphics are transmitted to Excel and WORD documents through the software. The evaluation report can be output efficiently.
The whole system consists of terminal cutting, grinding equipment (all-in-one machine), corrosion (special), microscopic imaging system, terminal analysis system, standard identification ruler (0.1mm), LED light source, computer and other units. The terminal microscopic analysis system can observe objects with a strong three-dimensional sense, clear imaging, and a long working distance. It adopts ergonomic design, modular combination, and assembly line workflow to make operation more convenient and quick. It saves time and effort, and greatly improves the speed of terminal section quality inspection.
The wiring harness of the whole vehicle shall comply with: VW60330, QC/T29106-2004 Technical conditions for low-voltage wiring harnesses of automobiles
(1) The standards for inspecting the size of wiring harnesses are specified.
(2) The performance requirements for the materials and components used in the wiring harness are specified.
(3) The connection method between the terminal and the wiring harness and the requirements to be met after the connection are specified.
(4) The requirements to be met at the connection point between the terminal and the wiring harness are specified.
(5) The sealing plug should not be damaged during crimping. There should be no visible gap between the wire and the sealing plug, and between the sealing plug and the sheath.
(6) When wrapping the wiring harness, it should be tight and uniform, and should not be loose. When using a protective sleeve, there should be no displacement and bending of the wiring harness.
(7) The wires and components in the wiring harness should be assembled correctly, there should be no misalignment, and the terminal should not fall out of the sheath.
(8) The line conductivity in the wiring harness is 100%, and there is no short circuit or wrong circuit.
(9) Wire harnesses need to undergo tests for resistance to high and low temperatures, humidity cycles, vibration, salt spray, and industrial solvents, etc.
System Features:

1. Easy sample preparation, no resin solidification

This system only takes 3 to 5 minutes to prepare a sample, saving you a lot of time and improving work efficiency. The traditional resin solidification method is to first solidify the sample with resin, cut the resin, coarsely grind, and grind it. It takes several hours to make a sample, and it will affect the measurement accuracy.

2. The terminal fixture can fit terminals of various sizes

The newly developed fixture can fit terminals of various models. There is no need to worry about the wire teeth being deformed or the core wire flying out during cutting and grinding. No special skills are required. The software operation is accurate and fast. One-click start completes the calculation of values and prints the corresponding report. The operation is simple and convenient, while improving work efficiency.

Image display
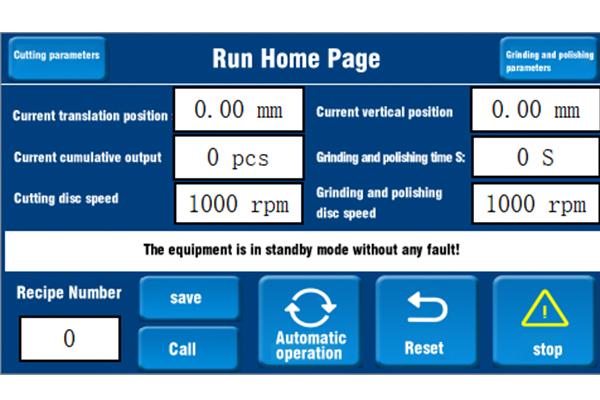
1. Instrument touch screen automatic mode control interface (using Japanese original Mitsubishi PLC control system)

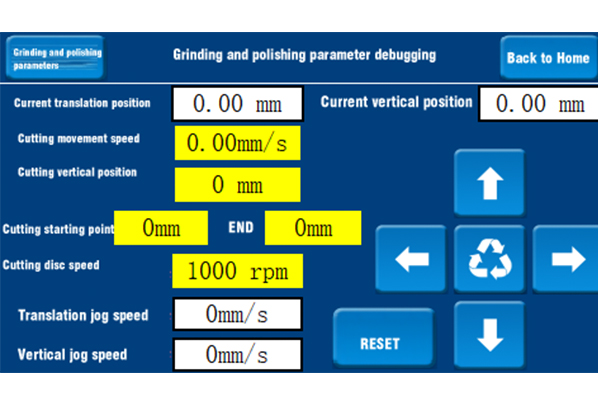
2. Cutting parameter control interface

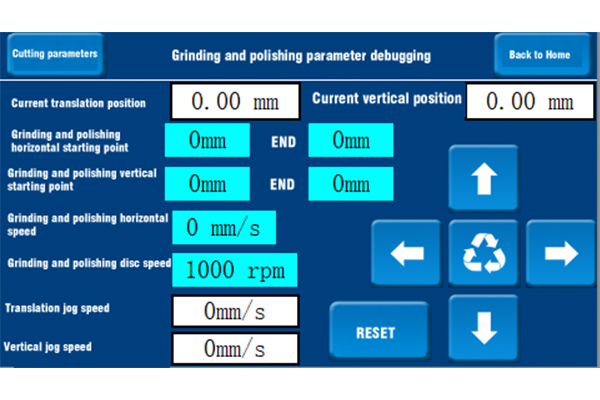
3. Grinding and polishing parameter control interface

1. Generally, the system is required to include hardware, software and various consumables. The system can realize automatic cutting and grinding. The software can automatically identify, read and detect various data of the terminal and make judgments and measurements.
2. There is a protective safety guarantee to ensure that the wire teeth will not be deformed or the core wire will not fly out during cutting and grinding.
3. In addition to automatically judging the pass rate, the software also has the function of assisting appearance judgment.
Software features and description:
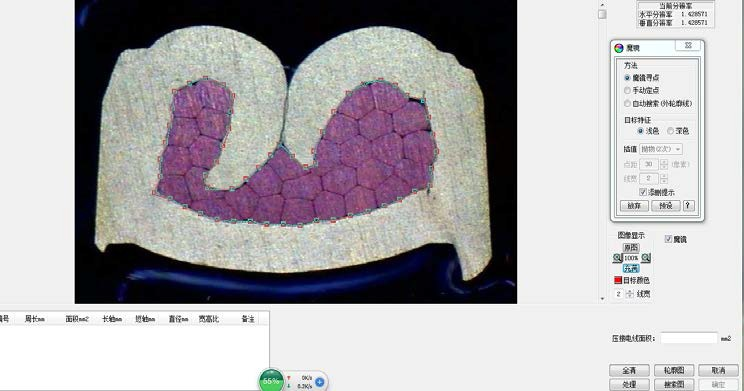
The software has functions such as automatic search, magic mirror edge search, and manual search. The image can select the corresponding measurement method in the software under any circumstances, find the edge and measure the compression ratio and compression rate and other related data with one click. It is easy to learn and understand, and makes up for many shortcomings in the operation process of similar software. It is faster and more convenient than similar software, greatly shortening the operation time, and truly completing the entire operation process within 3-5 minutes.


Conditions of Use

a) Ambient operating temperature: -20℃~+40℃.

b) Relative humidity of the operating environment:
95% (the average minimum temperature of the month is 25°C

Functional and performance requirements

a) Mechanical component configuration:
1 set of automatic cutting and grinding circulation system, range 0.8mm²~150mm²

· 1 pair of terminal special clamps, range 0.8mm²~150mm² (clamping diameter 1MM-14MM)

· 3 matching cutting grinding wheels

· 100 matching grinding sandpapers

· 1 bottle of image restoration cleaning fluid (50ml)


b) Image imaging system configuration:

· Terminal cross-section microscopic analysis magnification: 0.7-4.5X or 1-5X (6 levels), total video magnification: about 30X-300X

· 1 set of high-definition industrial USB 2.0 video system with 3 million pixels.

· 1 cold light LED with full white adjustable lighting device.


c) Special analysis software configuration:

· 1 set of the latest terminal special software (Chinese), free upgrade.

(Note: The software is set to VW60330 standard. different industry standards can be set according to the user's standards)

· 1 high-precision calibration ruler 10mm/0.1mm× (precision: 1um).


d) Computer

· Intel CPU Dual Core - 4GB RAM - 500G Hard Drive

· 19-inch LCD Monitor - DVD Drive - Windows 7 Simplified Operating System 


Main technical parameters

1. Precision automatic cutting table

2. Precision automatic grinding table

3. Scope of application of wire terminals:

0.8m~150m

4. Power supply:

AC220V/50HZ/750W

5. Cutting disc specifications:

Φ110*0.5mm

6. Screw type clamp:

Maximum clamping diameter 14MM·

7. Security door:

Lift the cover and the machine stops.

8. Machine size:

380*465*333MM (length*width*height)

a) Cutting module
Range: 0.08mm2 to 150.mm2
Speed: 2800 rpm
The instrument can move up and down, left and right, cut and grind, and reset after completion without manual operation.
Terminals are automatically cut and grinded in 60S,
X and Z axis servo automatic control system, power: 40W,
Automatic feeding cutting and grinding can be realized.
b) Grinding module
Grinding speed: 1400 rpm/min,
Grinding disc diameter: 120mm,
Z fine adjustment range: automatically settable
c) Etching part
Special advanced technology cleaning fluid, no blackening, no odor, no toxicity, good cleaning effect.
d) Image capture part
After the terminal is cut and ground, the terminal fixture can be accurately positioned under the camera when capturing the picture, without the need to hold the fixture.
Total magnification of the video 20~300X.
High-quality, low-distortion optical instruments.
Magnification: 0.7X/1X/1.5X/2.0X/2.5X/3.0X/3.5X/4.0X/4.5X
Gear fixed magnification: 0.7~4.5 (all).
Super bright white LED light source can be controlled in 6 sections.
e) Analysis and archiving part
3 million pixel high-definition industrial camera, USB2.0 interface, and supporting software.
The test software has functions such as automatic edge search, magic mirror edge search, and manual fixed-point edge search, it greatly avoids defects or deficiencies in fully automatic search and fully shortens the test time. A single test takes 3-5 minutes to complete.
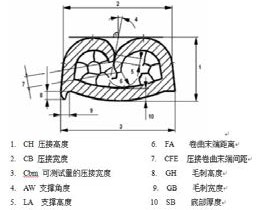
The software automatically determines whether it is qualified (CH, CB, Cbm, AW, LA, FA, CFE, GH, GB, SB and compression ratio).

f) Power supply
220 VAC, 50Hz, 300W
110 VAC, 60Hz, 300W
Volume and weight
Weight: 80 kg±10 kg
g) Related accessories display

×

Contact Us

captcha